- Cek dengan lampu 12 v 100 watt kondisi baterai.
- Pasang baterai posisi pararel + ketemu - sebelah.
- kebel panjang ketemu ujung baterai.
- Tutup kembali semua sekring pada bagian belakang ups.
- Switch ON kan IA2 (output isolator)
- Hidupkan MCB saluran UPS
- Pada posisi LOAD NOT PROTECTED, Setting ke command - load to inverter, press ENTER.
- Cek tegangan +- 325 V.
skip to main |
skip to sidebar
Tested 22 July 2016
Step By Step For Dummies:
1) Create Temp folder (doesn't matter where, you can delete it when you're done.
2) Download the directx_Jun2010_redist.exeinto said temp folder
3) Run directx_Jun2010_redist.exe by double-clicking
4) Box will pop up asking for a location in which to extract the install files (starting to get it?)
5) Input "C:\..." path to your Temp folder and confirm (If you cant find the pathway, open the Temp folder and copy the address bar as input)
6) After extraction is complete, Temp folder will be filled with around 157/158 archive files, two .dll files, the directx_Jun2010_redist.exe you just ran and ONE other .exe (should be something like "DXSETUP.exe") if you cant see it, click on the fille type column header to re-sort untill the .exe and .dll files are at the top (NO MORE THAN TWO CLICKS!!!)
7)Run DXSETUP.exe
8)Follow step by step wizard to complete setup (won't ask for anything technical and if you fsck this part up you need to step away from the computer)
Delete Temp Folder if desired (like I said, no baring on the product after installation is complete)
8) Congrats, now go play that game you've been itching for ;)
Hope this helps; even my most negligent and un-trustworthy users can do this now :)
edit:
really cant believe that Microsoft's left this unanswered, found it solved on Yahoo of all places when doing thorough search!!!
Rabu, 17 Agustus 2016
Ganti baterai UPS Power scale
Jumat, 05 Agustus 2016
Work : BISS KEY Procedure
Pada Receiver Ericsson RX 8200 : Setelah input BISS Code, pastikan BISS : MODE E USER ONE. Pada Receiver Harmonic 8100 : Setelah input BISS Code, pastikan Program selection - Descrambling posisi BISS.
Rec. Ericsson RX 8200 : Biss Key : 16 Digit.
Biss User One Key : 14 Digit.
Receiver Harmonic 8100 : ESW : 16 Digit.
ID : 14 Digit.
Rec. Ericsson RX 8200 : Biss Key : 16 Digit.
Biss User One Key : 14 Digit.
Receiver Harmonic 8100 : ESW : 16 Digit.
ID : 14 Digit.
Senin, 25 Juli 2016
Solution to "There has been a problem writing to the hard disk drive!" in WinHIIP
Had a bit of a problem formatting a hard drive for HDLoader today. All
attempts to write or otherwise modify the drive resulted in the error
"There has been a problem writing to the hard disk drive!".
Though I did find some helpful tips on here and on Google, none of them solved the problem. As a result, some of this information will be borrowed from other posts. If you feel you deserve credit for this post, send me a PM with a link to your post and I will credit you at the bottom.
But first, a note that will help your odds of success if you experience this same problem.
- Connect your drive directly to a computer whenever possible. WinHIIP seems to have trouble with USB Enclosures and USB Converters.
And now to the guide.
If you haven't already, bookmark this link, shut down your computer and plug the drive into your PC, preferably via an IDE cable rather than a converter.
After your computer has rebooted, go to Computer Management. If you are running Windows Vista or 7, this can easily be done in the start menu with a simple search.
It may take a moment to load, but once loaded, you will see a window similar to this:

Double click Storage, then double click Disk Management.
After a short load, you should see something similar to this:

The Disk number may be different, but you should remember the number so you don't accidentally wipe the wrong drive.
Click OK.
Right click the tab on the left (circled in red) and click Initialize Disk or Online if the Disk initialized automatically. Then, Right click the Unallocated space on the disk (circled in green) and click New Simple Volume.

Proceed through the New Volume Wizard, setting the Volume size to the maximum disk space and formatting the drive under the NTFS file system. Check Perform a quick format as we will be doing a full format later.
Wait for the drive to finish formatting, then right click the healthy partition you just made and click Delete Volume.
Now, open WinHIIP and click Select Drive, then select your drive. Press OK to all errors that pop up upon loading the drive.
At this point you should be able to write to the drive with no problems. I suggest formatting the drive to your personal preferences before doing anything else.
Hopefully this will help anyone to come who has a similar problem to mine.
Though I did find some helpful tips on here and on Google, none of them solved the problem. As a result, some of this information will be borrowed from other posts. If you feel you deserve credit for this post, send me a PM with a link to your post and I will credit you at the bottom.
But first, a note that will help your odds of success if you experience this same problem.
- Connect your drive directly to a computer whenever possible. WinHIIP seems to have trouble with USB Enclosures and USB Converters.
And now to the guide.
If you haven't already, bookmark this link, shut down your computer and plug the drive into your PC, preferably via an IDE cable rather than a converter.
After your computer has rebooted, go to Computer Management. If you are running Windows Vista or 7, this can easily be done in the start menu with a simple search.
It may take a moment to load, but once loaded, you will see a window similar to this:

Double click Storage, then double click Disk Management.
After a short load, you should see something similar to this:

The Disk number may be different, but you should remember the number so you don't accidentally wipe the wrong drive.
Click OK.
Right click the tab on the left (circled in red) and click Initialize Disk or Online if the Disk initialized automatically. Then, Right click the Unallocated space on the disk (circled in green) and click New Simple Volume.

Proceed through the New Volume Wizard, setting the Volume size to the maximum disk space and formatting the drive under the NTFS file system. Check Perform a quick format as we will be doing a full format later.
Wait for the drive to finish formatting, then right click the healthy partition you just made and click Delete Volume.
Now, open WinHIIP and click Select Drive, then select your drive. Press OK to all errors that pop up upon loading the drive.
At this point you should be able to write to the drive with no problems. I suggest formatting the drive to your personal preferences before doing anything else.
Hopefully this will help anyone to come who has a similar problem to mine.
Minggu, 24 Juli 2016
How to disable Group By in Windows 7
Windows Explorer on Windows 7 tries to be intelligent and offers to group
the contents of a directory according to certain parameters. A lot of
times when it cannot do this, it lumps them in a group named
To turn off Group By completely:
Unspecified. I find this grouping affair very irritating, especially when selecting files using the keyboard.
To turn off Group By completely:
- Open any directory in Windows Explorer.
- Right-click and choose Group by > (None)
- Press the Alt key, so that the Explorer menu bar appears and choose Tools → Folder Options.
- Go to the View tab and click Apply to Folders. This will apply the Group By setting to all folders.
Jumat, 22 Juli 2016
directx june 2010 asks what location to put extracted files.
Tested 22 July 2016
Step By Step For Dummies:
1) Create Temp folder (doesn't matter where, you can delete it when you're done.
2) Download the directx_Jun2010_redist.exeinto said temp folder
3) Run directx_Jun2010_redist.exe by double-clicking
4) Box will pop up asking for a location in which to extract the install files (starting to get it?)
5) Input "C:\..." path to your Temp folder and confirm (If you cant find the pathway, open the Temp folder and copy the address bar as input)
6) After extraction is complete, Temp folder will be filled with around 157/158 archive files, two .dll files, the directx_Jun2010_redist.exe you just ran and ONE other .exe (should be something like "DXSETUP.exe") if you cant see it, click on the fille type column header to re-sort untill the .exe and .dll files are at the top (NO MORE THAN TWO CLICKS!!!)
7)Run DXSETUP.exe
8)Follow step by step wizard to complete setup (won't ask for anything technical and if you fsck this part up you need to step away from the computer)
Delete Temp Folder if desired (like I said, no baring on the product after installation is complete)
8) Congrats, now go play that game you've been itching for ;)
Hope this helps; even my most negligent and un-trustworthy users can do this now :)
edit:
really cant believe that Microsoft's left this unanswered, found it solved on Yahoo of all places when doing thorough search!!!
Install Game Dengan USBUtil ver 2.00
this article has tested on friday, 22 Jul 2016
Bagi anda yang mengunakan Hd external atau Flashdisk sebagai media penyimpanan game,yang loadingnya mengunakan OPL atau Usb Advance.Instal gamenya bisa mengunakan USBUtil, lebih mudah dalam mengunakanya.untuk instal game sebenarnya banyak software seperti USB insane,USB Extreme dan mash banyak yang lainya.Tapi saya cenderung lebih baik mengunakan USBUtil.
Berikut ini gambaran cara Install Game Dengan USBUtil :
USBUtil ver 2.00 (Download)
Bagi anda yang mengunakan Hd external atau Flashdisk sebagai media penyimpanan game,yang loadingnya mengunakan OPL atau Usb Advance.Instal gamenya bisa mengunakan USBUtil, lebih mudah dalam mengunakanya.untuk instal game sebenarnya banyak software seperti USB insane,USB Extreme dan mash banyak yang lainya.Tapi saya cenderung lebih baik mengunakan USBUtil.
Berikut ini gambaran cara Install Game Dengan USBUtil :
- Terlebih dahulu anda tancapkan HD EXternal atau Flashdisk anda sebagai media penyimpanan,untuk kali ini saya mengunakan Flashdisk dengan kapasitas 8 Giga.
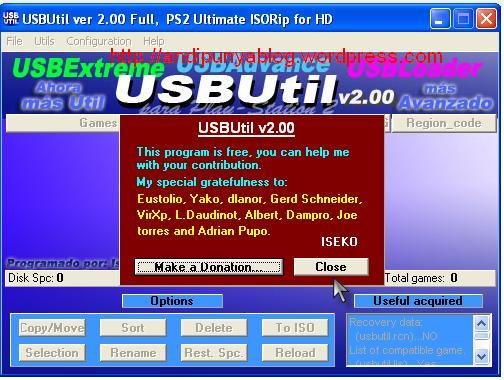
- Buka program USBUtil tampilan awal seperti gambar di bawah

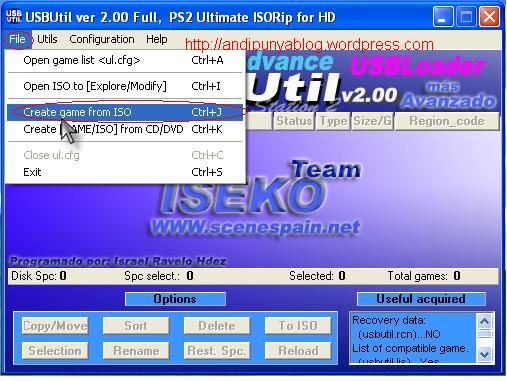
- Selanjutnya anda klik Close,anda pilih pada tab File,jika anda mengunakan file dari hardisk komputer anda dan File gamenya telah di Convert jadi File ISO maka anda pilih Create game from ISO.

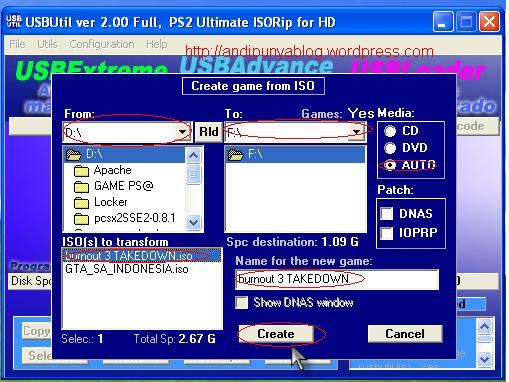
- Selanjutnya anda akan di minta dimana anda menyimpan game anda untuk di Instal ke Flashdisk

- Pada option sebelah kiri anda pilih Di Drive mana anda simpan file game anda,saya menyimpanya di Drive D: terlihat pada gambar ada 2 game yang saya simpan,selanjutnya pada option sebelah kanan pilih di drive mana anda menancapkan Flashdisk Anda,jangan sampai salah memilih.
- sesudah anda pilih Flashdisknya,anda pilih game yang anda ingin instal Contoh saya menginstal Burnout 3 TAKEDOWN selanjutnya anda klik pada tab Create.Tungulah hingga proses penginstalan selesai.
- cara di bawah ini adalah mengunakan CD\DVD untuk menginstal Game pada HD External atau Flashdisk.

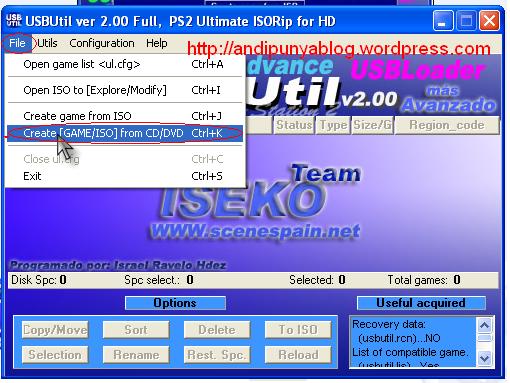
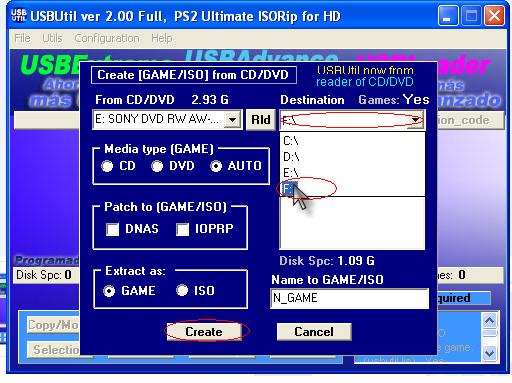
- Masukan CD/DVD game ke DVD rom Jalankan program USBUtil selanjutnya pada File anda pilih Create [GAME/ISO]from CD/DVD

- pada option sebelah kiri terlihat CD/DVD Rom Sudah terdeteksi secara otomatis,pada option sebelah kanan anda pilih dimana anda menancapkan Flashdisk anda Selanjutnya anda klik pada tab Create,tungulah hinga proses penginstalan selesai.
USBUtil ver 2.00 (Download)
Categories
- Sains (2)
2009 - Pondok Baca Faiz. Powered by Blogger
Blogger Templates created by Deluxe Templates
Wordpress Themes developed by Templatelite.com
Blogger Templates created by Deluxe Templates
Wordpress Themes developed by Templatelite.com